

Create my first page with a website builder
Support création de site web > Construire mon site > Créer ma première page
Website structure : how to use blocks and widgets to build a page
Estimated time : 15 minutes
What you need: nothing so far, it's a simple exercice to get started with Orson :)
Orson works a bit like a construction game: you combine different elements (pre-assembled or custom-made) in order to build the page that suits your needs. You can modify it any time, until to reach the result that you're looking for.
1) Open a page
- Click on "New page" to open a test page,
- Or click directly on the picture of the page that you want to modify (and go to step 3).
NB : if you're on a Onepage site, you can't create a new page. Click directly on the picture to edit your page and go to step 3.

2) Choose a layout for your page
- Give your page name. This name is only visible to you as an admin and it will help you find it later. If you leave that field blank, you won't be able to save ;)
We have several pre-assembled page layouts. In many cases you can use these layouts directly, but you of course also customize each of them if you prefer!
- Click on the layout that you like. In our case, to create a test page, we start with the first homepage model.
- Validate by clicking on OK.
Let's go!


3) Understand a page layout on Orson
You arrive in your page editor. The editor works the same way with all templates and page layouts.
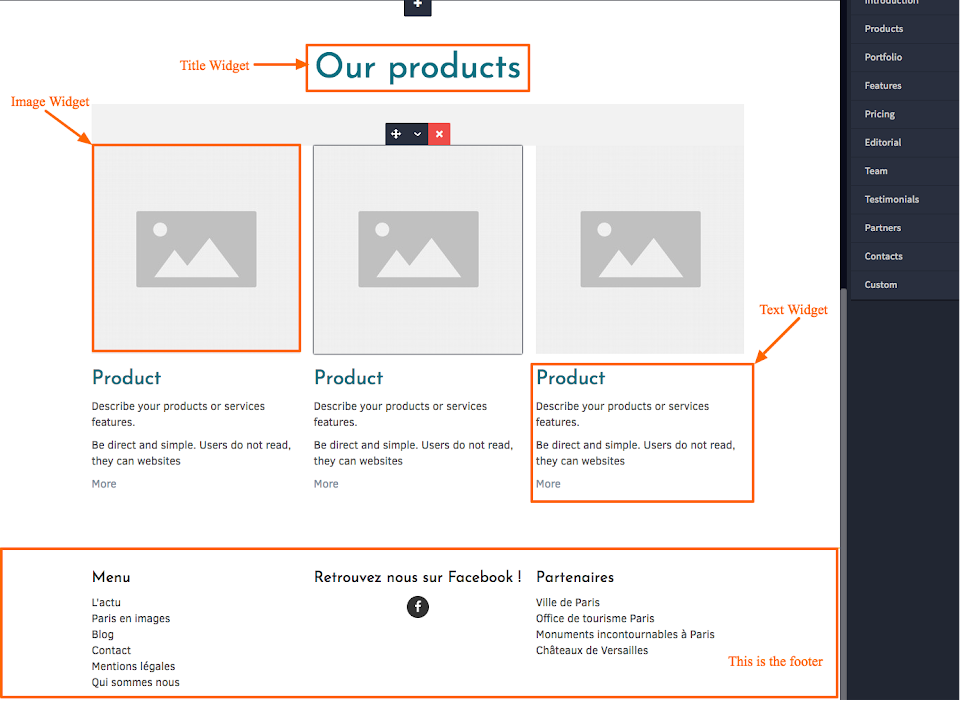
The header:
The header is the upper part of your page and usually includes your logo and your navigation bar. The header is identical on every page of your website, which means that if you modify it once, changes will apply automatically on all pages.
Blocks:
Under your header, you'll find several blocks that form the content of you page. Blocks are pre-designed elements that have been built that our designers, in order to fit the needs of 99% of the websites. You'll find
- blocks to present your company,
- blocks to present products,
- testimonial blocks,
- and so on ;)
When you click inside a block, a line appears to show you the block's limits.

Widgets :
Each block contains so called "widgets", ie titles, texts, images... We have framed the widgets in orange in our example to show them to you.
The footer :
The footer is the lower part of the your page. It may have a different layout according to the template that you picked when you started your website.
Just as the header, the footer is identical on every page of your site. If you modify it once, changes apply automatically on every page.
It's the perfect place to place a link towards your term of use, and links towards your social networks.
You can customize your footer anytime.
Now we'll see how to edit your blocks and widgets to customize your page!
4) How to add and edit a block
- Click on the Block tab in the upper right corner of your page editor
- Choose your the type of block you want.

Click on the block and drag it into your page, between 2 existing blocks.
The blue lines show you where you can drop it. The space between the lines becomes dark blue when you can drop the block.
Option: if you prefer, you can double click on the chosen block. It will then get added under the last block and the footer.
Yay, you've just added your first block to your page.
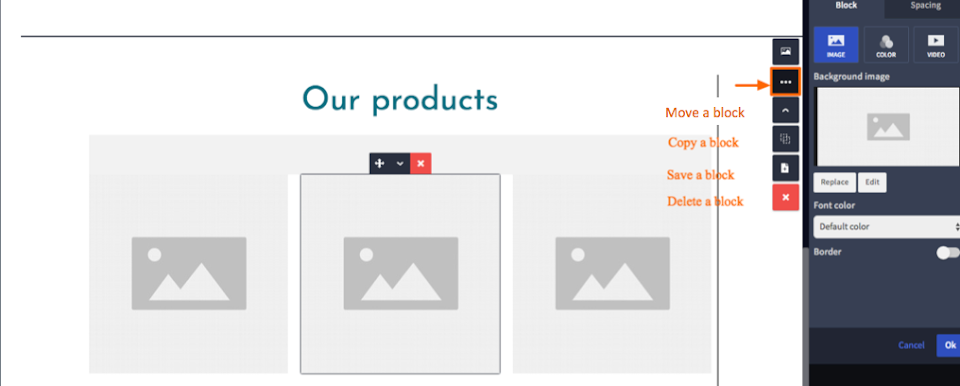
Click in the upper right corner of the block to make following options visible:
- block design: by clicking on the picture symbol, you access a menu where you can change the background of the block. Customize it with a nice backgroud image!
- button ... : click and access the options to move a block (by clicking on the arrows). You can also copy a block, or save it in order to reuse it later somewhere else on your site.
- delete a block: click on the red cross to delete a block.
5) How to add and edit widgets
- Click on the Widget tab in the upper right corner of the editor
- The list of widget appears ; you can choose to hide/display them if you click on manage my widgets.
- Choose the type of widget you want to add to your page.

- Click on a widget and drag it into the block.
- A blue line appears when you can drop the widget.

To edit a widget, click on it.
- The handle on the left helps you drag the widget if you want to move it elsewhere.
- The buttons in the middle help you move the widget up or down.
- The red cross is useful if you want to delete a widget.

In this example we've added a text widget.
Double click on the text or select the part you want to edit.
An edition tab appears.
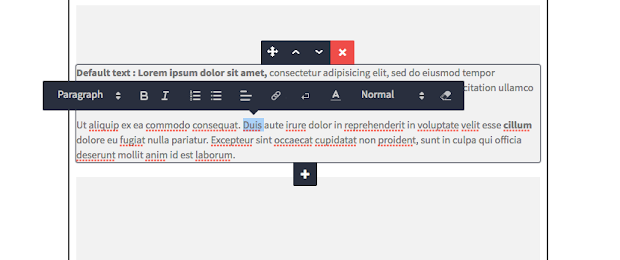
- Choose if your want your text to be a Title, Subtitle or paragraph.
- You can put the text in bold, italic ; create a list ; or add a link on a specific word or group of words.
By clicking on A, a color range appears, enabling you to enhance specific colors.
NB: the colors are the ones based on the theme of your website ; you can define your colors in the Theme section of your website.
- By clicking on Small, Normal, or Large you can chose the size of your text
- The eraser on the right enables to delete a style.
NB: the font is also defined in the Theme section of your website. It applies automatically to all texts, to keep your design and visual identity coherent.
6) How to resize the columns and use the grids
If you click on a widget, a bar appears on the side of it.
- Drag the bar on the left or right side to resize the column and your widget.
2 options
- If there is no widget next to it: an empty space appears. If you want, you can add a widget in the space.
- If there is a widget, it will resize automatically.